iKVM
Secure Login
Network Cards
Hard drives
Time
SSHFS
Basic DNS
Website DNS
Certbot SSL
Apache and PHP
Maria DB
Mail Server Basics
Mail Server SSL
Mail Server Filters
Checklist
Backup
Basic DNS

Note: This article series covers configuring Debian 12 for hosting multiple domains and web sites on a single dedicated server. As such, some strategies may be inappropriate for your environment. Sockets for example are appropriate for communication between services hosted on the same machine but not suited to a set up with distributed services (where you'd use ports). Please consult the overview for more information.
DNS or Domain Name System is a huge global network switchboard that on the face of it, does a fairly simple job simply converting names into server numbers and vice-versa.
When you start to consider how you might keep those records up to date and how you might do that over a cluster of servers, things can get complicated pretty quickly.
The sheer number of configuration options can baffle even the most experienced of administrators.
Luckily for us, we'll just be considering a single server hosting multiple domains so we only need to maintain a handful of DNS zones and I'll be showing you what I do to keep things as simple as possible.
There are lots of different approaches to solving this problem so I won't blame you if you end up using a different strategy, this is just what I find works nicely for me.
First a bit of theory in case you need a refresher!
When you type a domain name into the address bar of your browser, it will resolve that name to a number. The first thing your browser does is split that name by dots. Take the name benosborne.com, the com bit is called the top level domain and indicates the area of the database to look in, then benosborne within that area. benosborne.com is called the primary domain, www.benosborne.com for example is called a sub-domain.
Once it's found the correct record, it's interested in the 'name servers' for that domain name. By resolving the public name servers (called glue) the IP address of the host server is obtained. Every domain has 2 name servers listed (this is for redundancy).
Usually, the first name server IP address suffices to direct the browser to the web host which will answer
if it knows about the requested sub-domain. If it's www and it runs web services on either port 80 or 443 (SSL) the web server will deliver it's index page. If the first IP doesn't answer, the browser will try the 2nd one.
Once the primary domain server IP address has been found the browser contacts the server using its IP address to request the service it's interested in.
So what I like to do is have one primary server domain (blnkserver.com) which has 2 public name servers (ns1.blnkserver.com and ns2.blnkserver.com) which I then assign to all my domain names.
This way, if I move my server I can just update my 2 name server IP addresses and all my domains automatically point to my new server.
You can interrogate the global database using a DNS checking service like https://dnschecker.org.
Try it for ns1.blnkserver.com:
https://dnschecker.org/#A/ns1.blnkserver.com
Click the search button to interrogate the servers and you'll see it returns my server IP address for that name server.
Now let's look up benosborne.com on Nominet:
https://nominet.uk/lookup/?domain=benosborne.com
Scroll down and you'll see my 2 name servers ns1.blnkserver.com and ns2.blnkserver.com which is how a browser resolves my server IP.
So first we'll look at registering your primary server domain (blnkserver.com for me).
Then, we'll set up our primary server domain on our actual server and configure the forward and reverse DNS records (reverse DNS is where you provide an IP address and the database looks up the name for you).
Finally, we'll add those custom name servers (ns1.blnkserver.com and ns2.blnkserver.com) to the Internet DNS database.
Almost all public internet servers require that the server IP you specify for a public name server points to a server which can answer queries for that domain before it adds the name server records to its database, which is why we need to set the server up first!
In the next article we'll add a web site domain using your shiny new name servers.
First off, you need to register your primary server domain. I recommend namecheap because they have a 48 hour propagation time for your DNS changes, they're reasonably priced and their support is good.
Once you've got that, let's configure the Bind9 service on your server to answer queries for your new server domain. Bind9 comes installed on Debian so you just need to update your server to make sure you've got the latest stable version:
sudo apt update && sudo apt upgrade
Then you want to create a directory to store your zones:
sudo mkdir /etc/bind/zones
When you add a domain to your DNS server you first need to tell it about the domain name, later we define the zone file/s which describe any additional lookup records. In the examples below, replace blnkserver.com with your new server domain name:
sudo nano /etc/bind/named.conf.local
zone "blnkserver.com" {
	type master;
	file "/etc/bind/zones/blnkserver.com.db";
};
zone "177.201.74.in-addr.arpa" {
	type master;
	file "/etc/bind/zones/rev.177.201.74.in-addr.arpa";
};
The first block in the file defines the forward lookup zone (blnkserver.com) and the 2nd entry defines the reverse lookup zone (for when someone provides the IP address and wants to know which domain it's mostly associated with).
You won't need to specify a reverse lookup domain for every domain you host because you can only specify 1 per IP address.
My IP address range falls within 74.201.177.X, notice how the reverse zone is literally that address prefix backwards with .in-addr.arpa at the end.
When the server consults that reverse record it's looking for which specific IP represents which domain name which we'll define there. Don't think about it too much, it will all make sense when we define the zones.
Typically, you'll only define reverse lookup zones for your primary server domain.
Let's create the forward lookup zone file:
sudo nano /etc/bind/zones/blnkserver.com.db
; BIND data file for blnkserver.com
;
$TTL 86400
@ IN SOA blnkserver.com. admin.benosborne.com. (
2025081911 ; Serial
86400 ; Refresh
7200 ; Retry
2419200 ; Expire
86400 ) ; Minimum TTL
;
blnkserver.com. IN NS ns1.blnkserver.com.
blnkserver.com. IN NS ns2.blnkserver.com.

blnkserver.com. IN MX 10 blnkserver.com.
blnkserver.com. IN A 74.201.177.83
blnkserver.com. IN A 74.201.177.84
blnkserver.com. IN A 74.201.177.85
blnkserver.com. IN A 74.201.177.86

ns1 IN A 74.201.177.83
ns2 IN A 74.201.177.85

www IN A 74.201.177.83
mail IN A 74.201.177.83

blnkserver.com. IN TXT "v=spf1 mx ~all"
In a zone file, ending a domain name with . signifies the definitive ending of that name and removes any ambiguity.
Notice there are 2 NS records which indicate this domains name servers (in this example, itself) and defines those names. There's an MX record (Mail Exchanger record) which indicates this domain can accept email.
Then we've got our A records which are our sub-domain definitions - ns1, ns2, www and mail. Notice that ns1 and ns2 will also be the custom name servers that we define later but are also defined here, that's because this server is considered to be the authority for the domain blnkserver.com and must be able to answer queries about itself in isolation.
So if I wanted to know which IP address to contact for www.blnkserver.com for example, I'd first resolve the name to this server IP, then I'd ask this server which IP to consult for www (It'd tell me 74.201.177.83). You can also provide domain names instead of IP addresses which recursively resolve. See how it's getting complicated?
I had to set up forward lookup for each IP address I defined with my provider as a reverse lookup because it checked that it existed before it saved the record.
You can see I've got blnkserver.com as an A record for each IP address I want to advertise. It might not look like this does very much but now when I connect to a specific IP on this server and ask it about blnkserver.com it'll tell me about the IP addresses that know about my primary domain which is what my provider checks when I attempt to add a reverse DNS entry.
Note that every time you change a DNS record, you should update the serial number in the SOA section or your server might not pick up the change. I always go with YYYYMMDD## (year, month, day followed by update number) as then I can also see when I last made a change.
Now to the reverse lookup zone (used for resolving an IP address to a domain name), I like to prefix my reverse lookup zone file with rev. to remind me what it is. Note that a reverse lookup zone on this server is a bit redundant as it will likely be resolved by your provider before it gets to this server, I'll show you how you can set up reverse DNS with your provider in a mo:
sudo nano rev.177.201.74.in-addr.arpa
$TTL 86400
@ IN SOA blnkserver.com. admin.blnkserver.com. (
2025081913 ; serial
28800 ; refresh (8 hours)
14400 ; retry (4 hours)
3600000 ; expire (4 weeks)
86400 ) ; minimum TTL (1 day)
	IN	NS	blnkserver.com.
83	IN	PTR	blnkserver.com.
84      IN      PTR     blnkserver.com.
85 	IN	PTR	blnkserver.com.
86      IN      PTR     blnkserver.com.
Notice that the SOA (Start of Authority) declaration at the beginning of the file is essentially the same as your forward zone. It's the PTR records in this zone that are most important as they represent your individual IP addresses. Each one here is set up to return blnkserver.com (except .82 which I'm using for admin).
So if someone approaches this server asking about the IP address 74.201.177.83, Bind9 looks in this file (that's why the IP is in reverse - it knows about IP addresses in that range), finds the PTR record for that address and then returns blnkserver.com.
Once both those records are saved we need to change the bind configuration to allow it to answer queries from the outside world, set allow-query to any.
Note that the settings you specify in the options file will vary greatly depending on your server environment, so don't just copy my settings if you're not hosting everything on 1 server because it might get you into trouble!:
sudo nano /etc/bind/named.conf.options
...
    allow-query { any; };
...
Make sure you reload your bind9 server to pick up all the recent changes:
sudo systemctl reload bind9.service
Now we can add those custom name servers. Every provider is slightly different (some call them custom name servers, others call them personal name servers). If you registered your domain with namecheap then you'll need to login to your namecheap account and follow these instructions:
https://www.namecheap.com/support/knowledgebase/article.aspx/768/10/how-do-i-register-personal-nameservers-for-my-domain/
Once you've added them, you can track their propagation using dnschecker.com. Go to their web site and search for your name server ns1.< your_domain > - you'll see the servers gradually turn to green ticks and show the IP address you assigned to that name server. It can take up to 48 hours but often it happens within 24.
Once that's done, let's add the reverse DNS at your provider, most of the time they'll answer those queries.
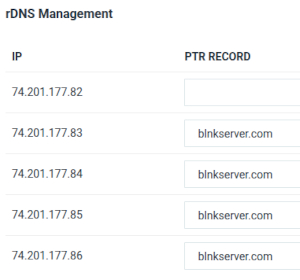
Login to your server control panel, find the reverse DNS section and enter your server domain name next to each IP. I left the IP I use for admin empty because I don't want it answering questions about itself:
Once your name servers have propagated, you can check everything's working using ping (which just returns network packets from your server).
First of all, flush the DNS cache on your local computer to make sure you're using a current route:
Older Ubuntu
sudo systemd-resolve --flush-caches
Newer Ubuntu
sudo resolvectl flush-caches
Then, ping your server by name. It should return one of your IP addresses and your server should send a few packets. Note that obviously you should ping your server name, not mine in the example below:
eg.
ping blnkserver.com
PING blnkserver.com (74.201.177.83) 56(84) bytes of data.
64 bytes from blnkserver.com (74.201.177.83): icmp_seq=1 ttl=51 time=140 ms
64 bytes from blnkserver.com (74.201.177.83): icmp_seq=2 ttl=51 time=139 ms
64 bytes from blnkserver.com (74.201.177.83): icmp_seq=3 ttl=51 time=139 ms
64 bytes from blnkserver.com (74.201.177.83): icmp_seq=4 ttl=51 time=140 ms

--- blnkserver.com ping statistics ---
4 packets transmitted, 4 received, 0% packet loss, time 3003ms
rtt min/avg/max/mdev = 138.585/139.496/140.494/0.754 ms
Cool! Now your server's on the internet!
Next we'll set up a new web site domain name using our new name servers.
nslookup
One very useful tool for diagnosing DNS problems on Linux is nslookup.There are numerous patterns for getting different kinds of results but the one I recommend for verifying your settings is interactive mode which you start by just entering 'nslookup' with no parameters:
nslookup
You'll be presented with a > prompt. If you now specify a server, nslookup will execute queries on that server so now you can see what your DNS server is returning:
server < your_IP_address >
eg.
server 74.201.177.83
Then simply enter the record you're interested in:
eg.
www.benosborne.com
Server:		74.201.177.83
Address:	74.201.177.83#53

Name:	www.benosborne.com
Address: 74.201.177.83
Or test your reverse DNS by entering one of the IP addresses you set up and see if it's returning your primary server domain name:
eg.
74.201.177.85
85.177.201.74.in-addr.arpa name = blnkserver.com.When you're finished with nslookup just type 'exit' to quit.